How to Use a Trigger Point Therapy Ball at Home
A trigger point therapy ball, such as a lacrosse ball, can be a simple and effective tool to help release muscle tension, improve mobility, and support your chiropractic care between visits.
The goal is not to “dig as hard as possible.” The goal is to apply gentle, steady pressure to areas of muscle tension so the body can gradually soften and relax.
You should feel pressure, tenderness, or a “good hurt” sensation — but never sharp pain, numbness, tingling, burning, or symptoms that travel down the arm or leg.
Guidelines
Use the ball for 30–90 seconds per area.
Start with light pressure and gradually increase as tolerated.
Breathe slowly while holding pressure.
Avoid rolling directly over bones, joints, the spine itself, or areas of swelling/bruising.
Stop if symptoms worsen or if you feel nerve-like sensations such as numbness, tingling, burning, or shooting pain.
For best results, use these exercises consistently and gently rather than aggressively.
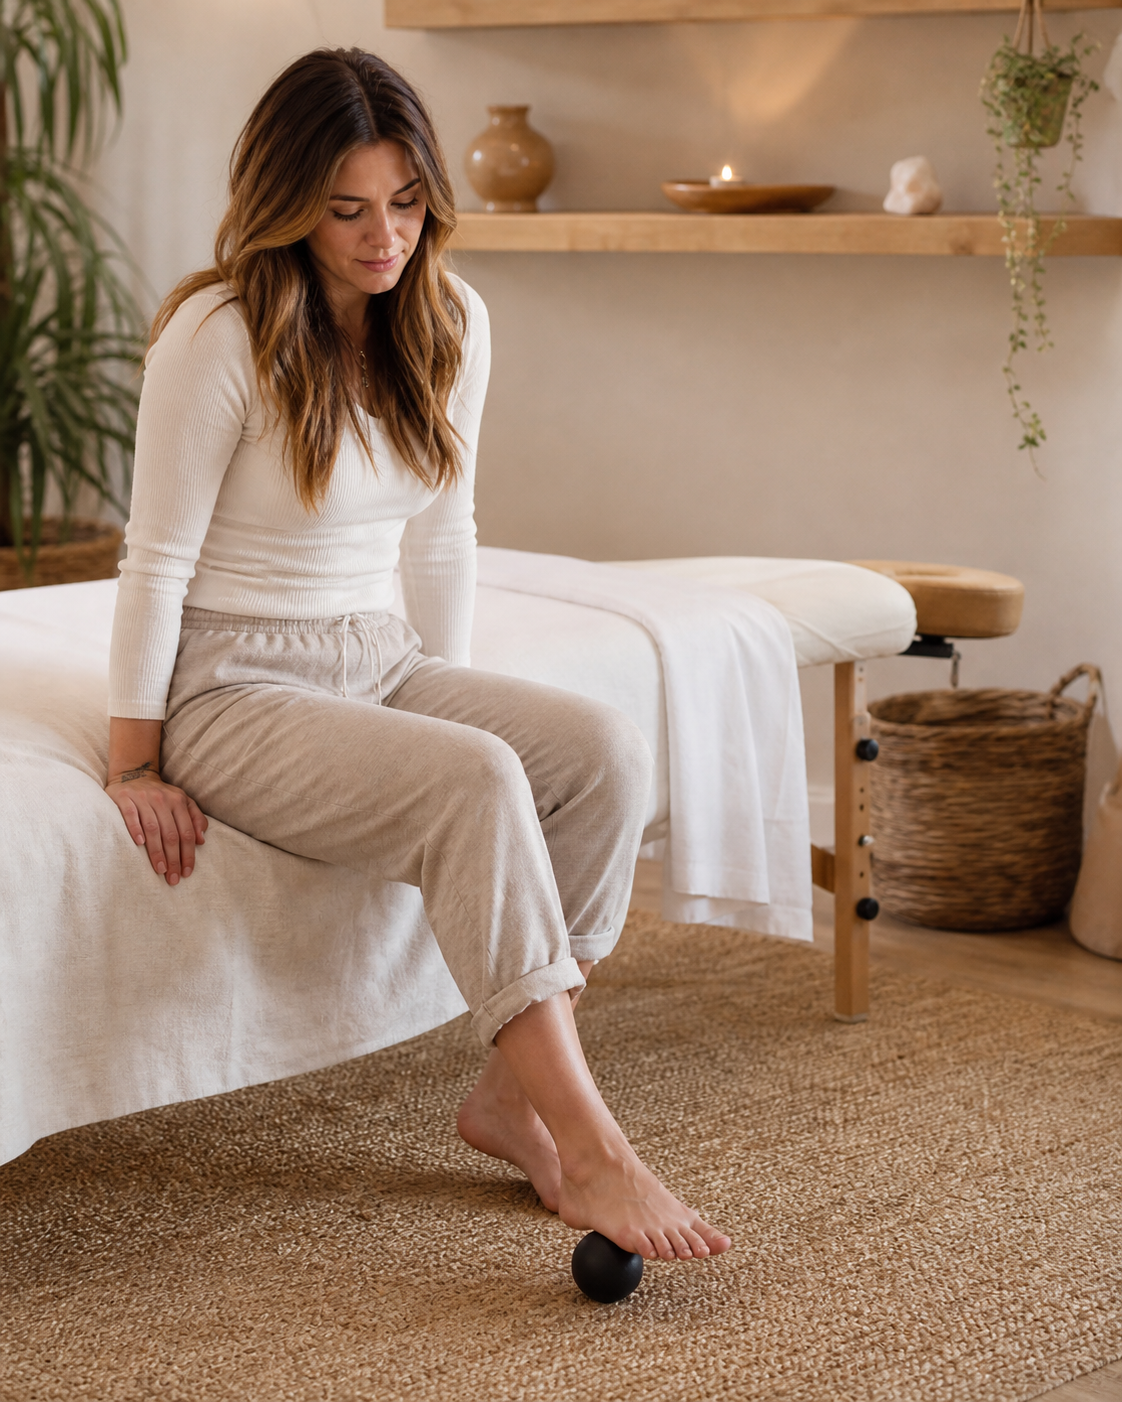
Plantar Fascia Release
Best for:
Foot tension, arch tightness, plantar fasciitis-type discomfort, heel pain, and general foot stiffness.
How to do it:
Place the ball under the arch of your foot while standing or sitting.
Slowly roll the ball from the heel toward the ball of the foot.
Pause on tender spots and hold gentle pressure for 20–30 seconds.
Move the ball side to side across the arch to find different areas of tension.
Repeat for 1–2 minutes per foot.
What you should feel:
You may feel tenderness along the arch or bottom of the foot. This should feel like deep pressure, not sharp pain.
Tips:
For more pressure, perform this while standing. For less pressure, do it seated.
This is a great exercise to do before getting out of bed, after long periods of standing, or after wearing unsupportive shoes.

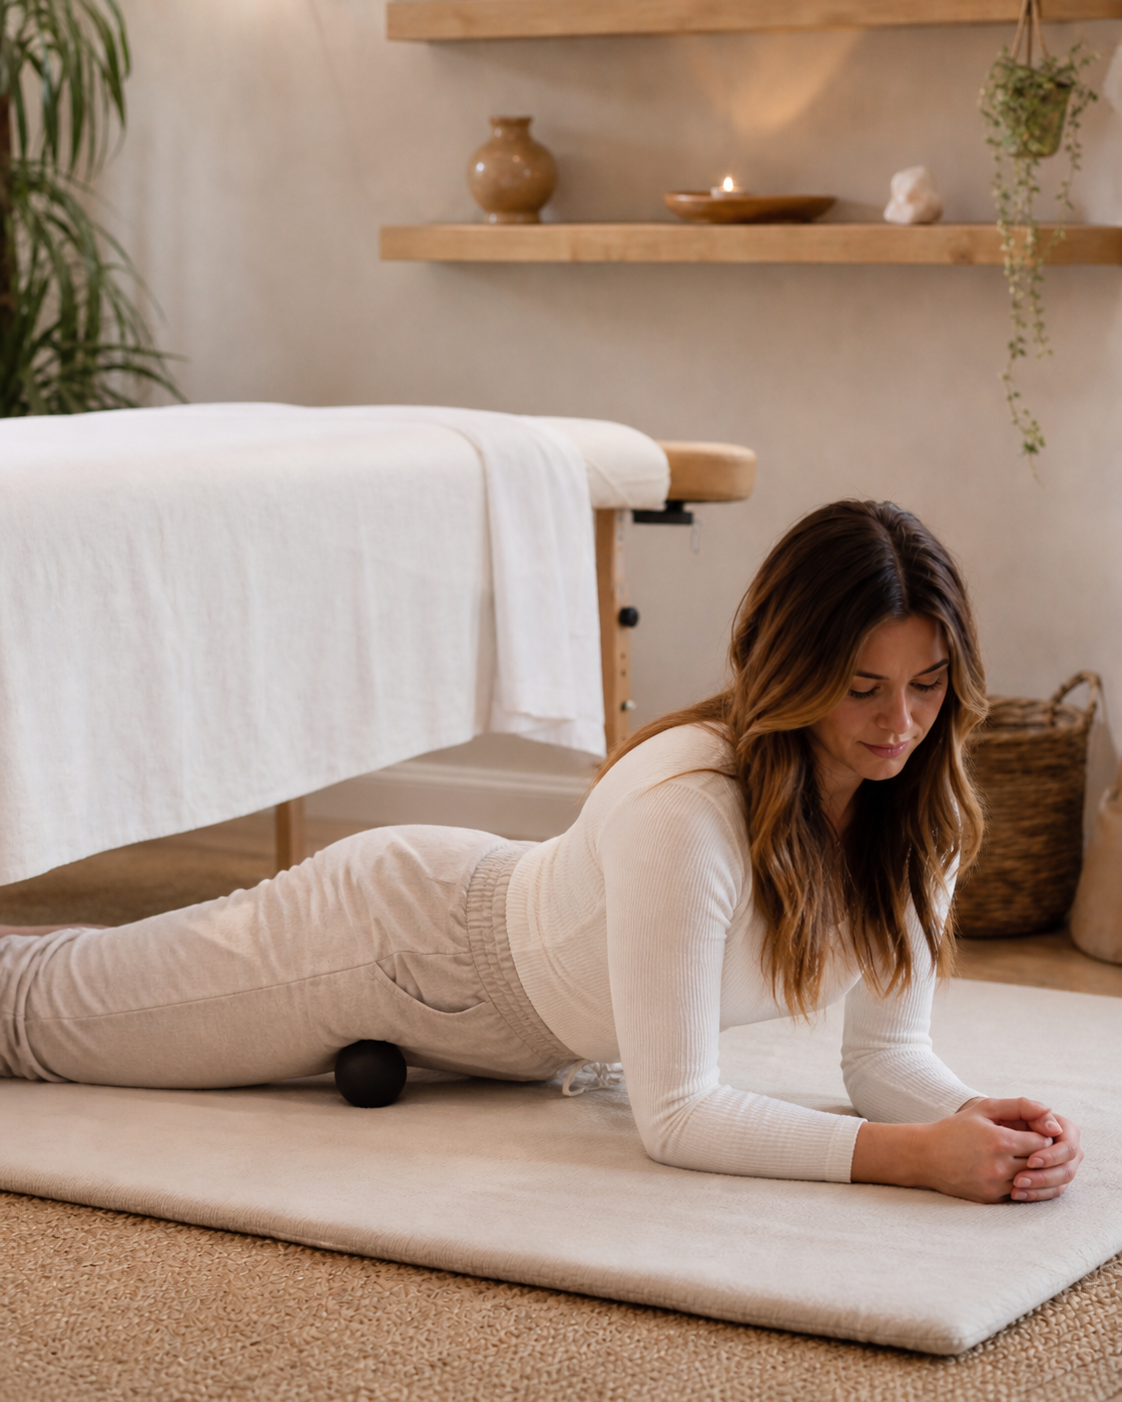
Piriformis Release
Best for:
Deep glute tension, hip tightness, sciatic-type irritation, low back compensation, and discomfort from prolonged sitting.
How to do it:
Sit on the floor with your knees bent.
Place the ball under one glute, slightly toward the outside of the hip.
Lean your body weight gently onto the ball.
Slowly roll in small circles or shift side to side.
When you find a tender spot, pause and breathe for 20–30 seconds.
For a deeper release, cross the ankle of the working side over the opposite knee.
Repeat for 1–2 minutes per side.
What you should feel:
A deep, tender pressure in the glute or hip area. You should not feel sharp pain or symptoms shooting down the leg.
Tips:
If this feels too intense on the floor, try the same release against a wall.
Avoid sitting directly on the ball near the tailbone or bony parts of the pelvis
Hip Flexor Release
Best for:
Front hip tightness, low back tension, pelvic compensation, discomfort from sitting, and tightness after running or workouts.
How to do it:
Lie face down or slightly angled on the floor.
Place the ball just below the front hip bone, in the soft tissue area of the hip flexor.
Avoid placing the ball directly on the hip bone or abdomen.
Gently relax your body weight onto the ball.
Breathe slowly and hold pressure for 20–30 seconds.
You can gently bend and straighten the knee on that side to add movement.
Repeat for 1–2 minutes per side.
What you should feel:
A deep pressure in the front of the hip. This may feel tender, but it should not feel sharp or pinchy.
Tips:
This is a sensitive area. Start with very light pressure.
Avoid this exercise if you are pregnant unless specifically guided by your provider.
Stop if you feel abdominal discomfort, nausea, nerve pain, or increased low back pain.

IT Band / Outer Thigh Release
Best for:
Outer thigh tightness, hip tension, knee compensation, and lateral leg discomfort.
Important note:
The IT band itself is a thick band of connective tissue and does not “release” the same way muscle does. The goal is to address the surrounding muscles, especially the outer quad, glute, and TFL area near the front/outside of the hip.
How to do it:
Lie on your side with the ball placed under the outer thigh.
Start higher up near the outside of the hip rather than directly on the knee.
Use your arms and opposite leg to control pressure.
Slowly roll along the outer thigh, stopping before you reach the knee joint.
Pause on tender spots for 20–30 seconds.
Repeat for 1–2 minutes per side.
What you should feel:
Tenderness along the outer thigh or hip. This area can be sensitive, so use gentle pressure.
Tips:
Do not roll directly over the knee joint.
If this is too intense on the floor, try placing the ball against a wall and leaning into it.

Rhomboid / Erector / Rib Area Release
Best for:
Mid-back tension, tightness between the shoulder blades, postural strain, desk-related tension, and rib-area stiffness.
How to do it:
Stand with your back against a wall.
Place the ball between your back and the wall, just to the side of the spine.
Slowly bend and straighten your knees to move the ball up and down.
You can also move side to side in small motions.
Pause on tender spots for 20–30 seconds.
Repeat for 1–2 minutes per side.
What you should feel:
Pressure in the muscles next to the spine or between the shoulder blade and spine.
Tips:
Do not roll directly on the spine.
The wall is usually better than the floor for this area because it allows better pressure control.
For rib-area tension, keep pressure gentle and breathe slowly.

Upper Trap Release
Best for:
Neck and shoulder tension, stress-related tightness, desk posture, headaches related to muscle tension, and tightness at the top of the shoulders.
How to do it:
Stand with your back or shoulder against a wall.
Place the ball on the upper trap area — the soft muscle between your neck and shoulder.
Lean gently into the ball.
Hold pressure on a tender spot for 20–30 seconds.
Slowly turn your head side to side or take deep breaths to help the muscle relax.
Repeat for 1–2 minutes per side.
What you should feel:
Pressure in the top of the shoulder. This area may be tender, especially with stress or prolonged sitting.
Tips:
Do not place the ball directly on the front or side of the neck.
Avoid aggressive pressure near the neck.
Stop if you feel dizziness, numbness, tingling, or pain traveling into the arm.

Forearm Release
Best for:
Wrist tension, elbow discomfort, gripping strain, computer work, texting, lifting, and tightness from repetitive hand use.
How to do it:
Place your forearm on a table with the palm facing up or down.
Place the ball under the forearm muscles.
Use your opposite hand to gently press the forearm into the ball.
Slowly roll from the wrist area toward the elbow, avoiding direct pressure on the wrist and elbow joints.
Pause on tender spots for 20–30 seconds.
Repeat on both the palm-side and top-side of the forearm.
Do this for 1–2 minutes per arm.
What you should feel:
Tender pressure through the forearm muscles. You may notice tight spots from typing, gripping, lifting, or repetitive use.
Tips:
Avoid rolling directly over the bony part of the elbow.
Keep pressure moderate and controlled.
This is helpful for patients who work at a computer, lift weights, carry babies, or use their hands repetitively throughout the day.
How Often Should You Use the Therapy Ball?
Most patients do well using the ball 3–5 times per week, or as recommended by their provider.
For chronic tension, consistency matters more than intensity. Gentle daily work for a few minutes is often more helpful than aggressive pressure once in a while.
A good starting point:
30–90 seconds per area
1–2 rounds per side
3–5 times per week
When to Stop
Stop using the therapy ball and check with your provider if you experience:
Sharp pain
Numbness or tingling
Burning sensations
Pain traveling down the arm or leg
Dizziness
Increased symptoms after use
Pain that feels worse instead of better
Trigger point work should help the body feel more relaxed and mobile — not irritated or flared up.
These exercises are meant to support your care between visits, but they are not a replacement for a personalized evaluation. Every body has different patterns of tension, compensation, and stress adaptation.
If you are unsure which areas are best for you, ask your provider at your next visit. We can help you choose the right releases for your body and show you how to do them safely at home.